Tutorial: Simple Ionic 5 App with React Context (using React Hooks) as well as Local Storage
Introduction
My name is Alex and I teach SWEN 325 course at Victoria University of Wellington that is called "Software Development for Mobile Platforms":
https://www.wgtn.ac.nz/courses/swen/325/2019/offering?crn=30041While preparing for the 2020 iteration of the course I could not easily find a self-contained tutorial describing a simple Ionic 5 App with React backend that would use both local storage and hooks to utilise contexts to maintain state between different components. The closest I found was easy to follow "Your First Ionic App: React" tutorial that covers storage but not hooks or contexts:
https://ionicframework.com/docs/react/your-first-appAnd separate and somewhat more abstract and thus a little harder to follow blog post that covers hooks for contexts but not storage:
https://ionicframework.com/blog/a-state-management-pattern-for-ionic-react-with-react-hooks/Thus, all this tutorial does is make a simple App which will make use of the local storage via hooks that utilise contexts to maintain state between different components. ;-)
Finally, I ask the reader to follow the existing instructions on how to install Ionic using npm available here: https://ionicframework.com/docs/intro/cliThe app I am going to create is going to enable me to track the dates and descriptions of migraines on my phone. Why migraines? Why not? Better than Yet Another To Do List. :-) I will assume that you have created your initial App using the following command:
ionic start SimpleMigraineTracker
And then you chose React as your choice of the framework and tabs as your choice of the starting template.
Let's begin!
Amending The Default App
When you open your newly generated folder in the code editor of your choice (I use Visual Studio Code on a Mac myself) you will see that the following files were created for you:
Firstly, let's rename Tab1.tsx into ListMigraines.tsx and Tab1.css into ListMigraines.css, then rename symbol Tab1 into ListMigraines using the nice VS Code right click and "Rename Symbol" feature, as well as replace the text in the IonTitle to say "List Migraines" in two places and remove the ExploreContainer so that your ListMigraines.tsx looks as follows (note additional changes to the imports as required):
Similarly, rename Tab2 into AddMigraine and rename Tab3 into Highlights and leave the ExploreContainer for the Highlights tab which will stay untouched in this tutorial. Finally, update App.tsx to reflect these renames to end up with the following:
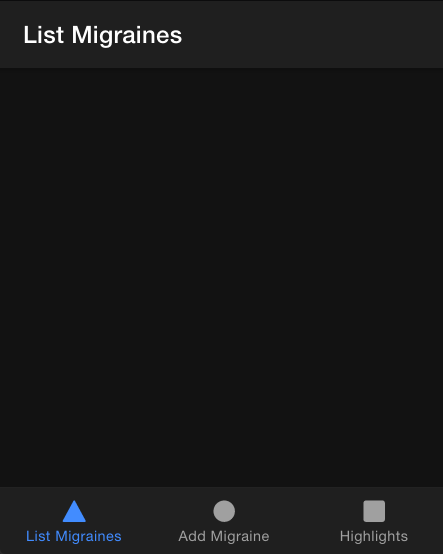
All going well, you should be able to now save your changes and run ionic serve to get something like this in your browser:
Adding and Displaying Basic State
We are now going to create a state of the App which happens to be a list of migraines that will be stored locally on the phone using React Context to be able to access it from various subcomponents without the need to pass such important global state around. I am roughly following the information contained in the State Management Pattern for Ionic React with Reach Hooks blog post. First, create a new file called MigrainesState.tsx in the same top level as App.tsx for simplicity.
We will begin with something extremely simple. We will create a "context" with a default "provider" and "consumer" and we will make the context contain an object of type Migraines that simply has an array of migraines as its content with interface Migraine defined to have two string fields: date and description.
The simple idea of React Contexts is that you can then put a Provider component at the highest level in the React Component hierarchy and this will ensure that any subcomponent that would use a matching Consumer can simply get access to the state stored in the relevant Context!
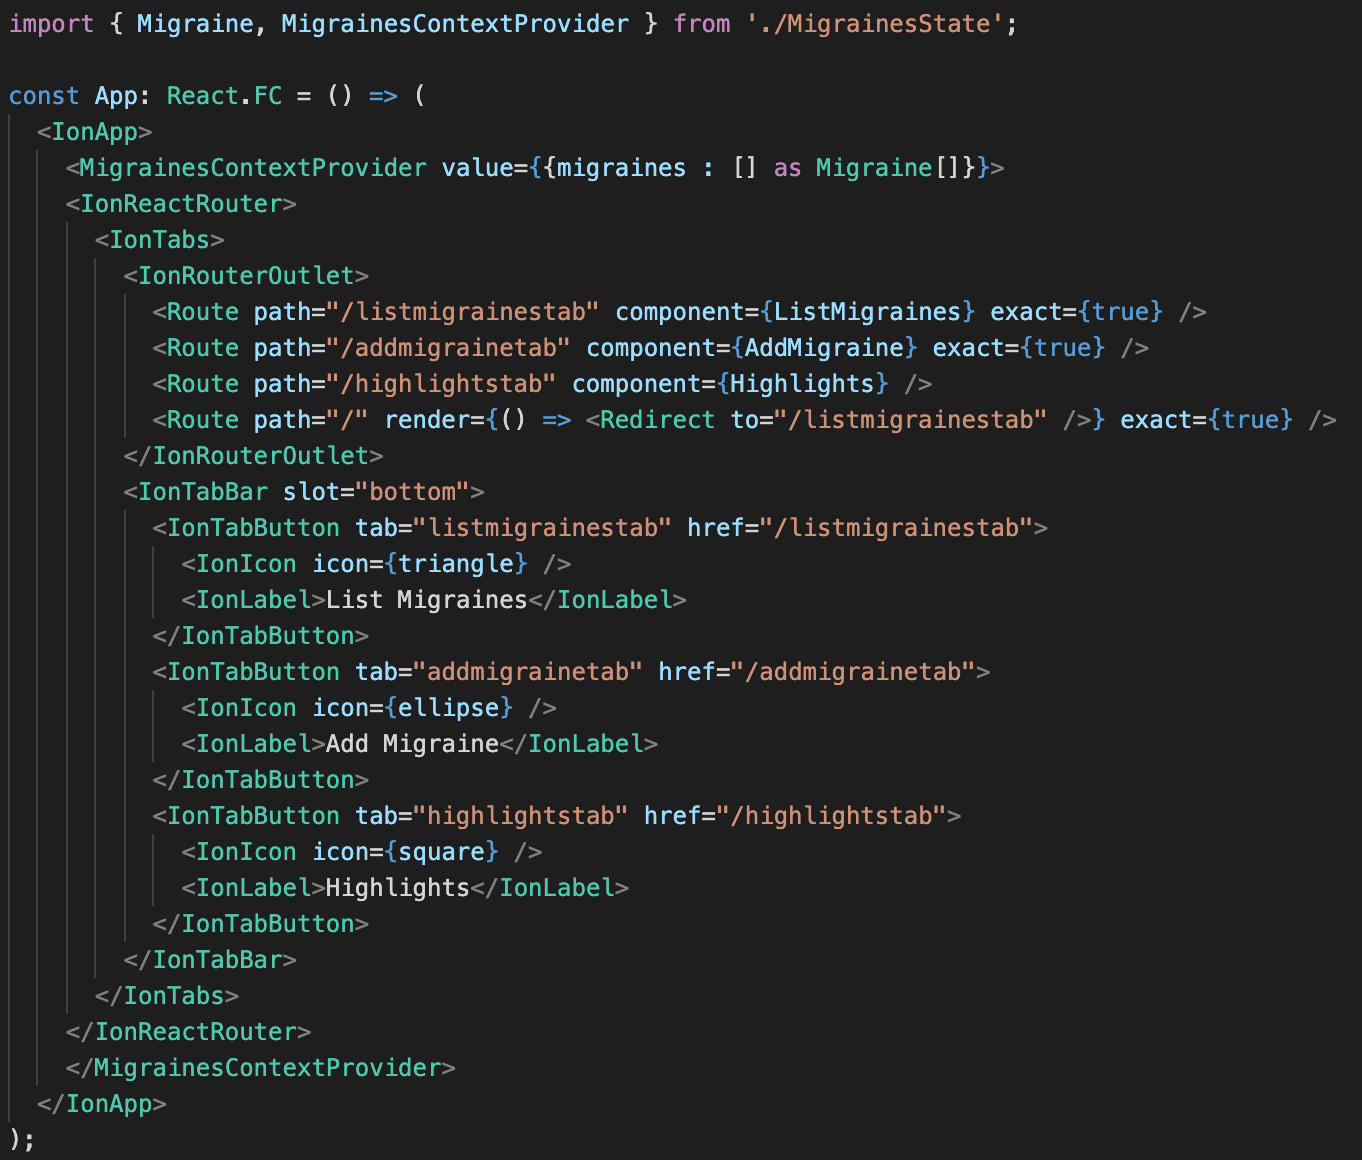
In our case, I recommend updating App.tsx to wrap the entire IonReactRouter subcomponent of IonApp with MigrainesContextProvider which will be given an empty array of migraines making it accessible throughout all the subcomponents including our tabs:
Let us now provide a way to add and view the migraines making the two tabs use MigrainesContextConsumer. Firstly, we modify AddMigraine.tsx to use two IonInput components to capture the date and description as user inputs. Secondly, we wrap MigraineContextConsumer around the IonButton that will then add a new migraine to our array stored in the global context! The magic is the context value provided by the Consumer component that gives us access to our migraines. The resulting code will be as follows:
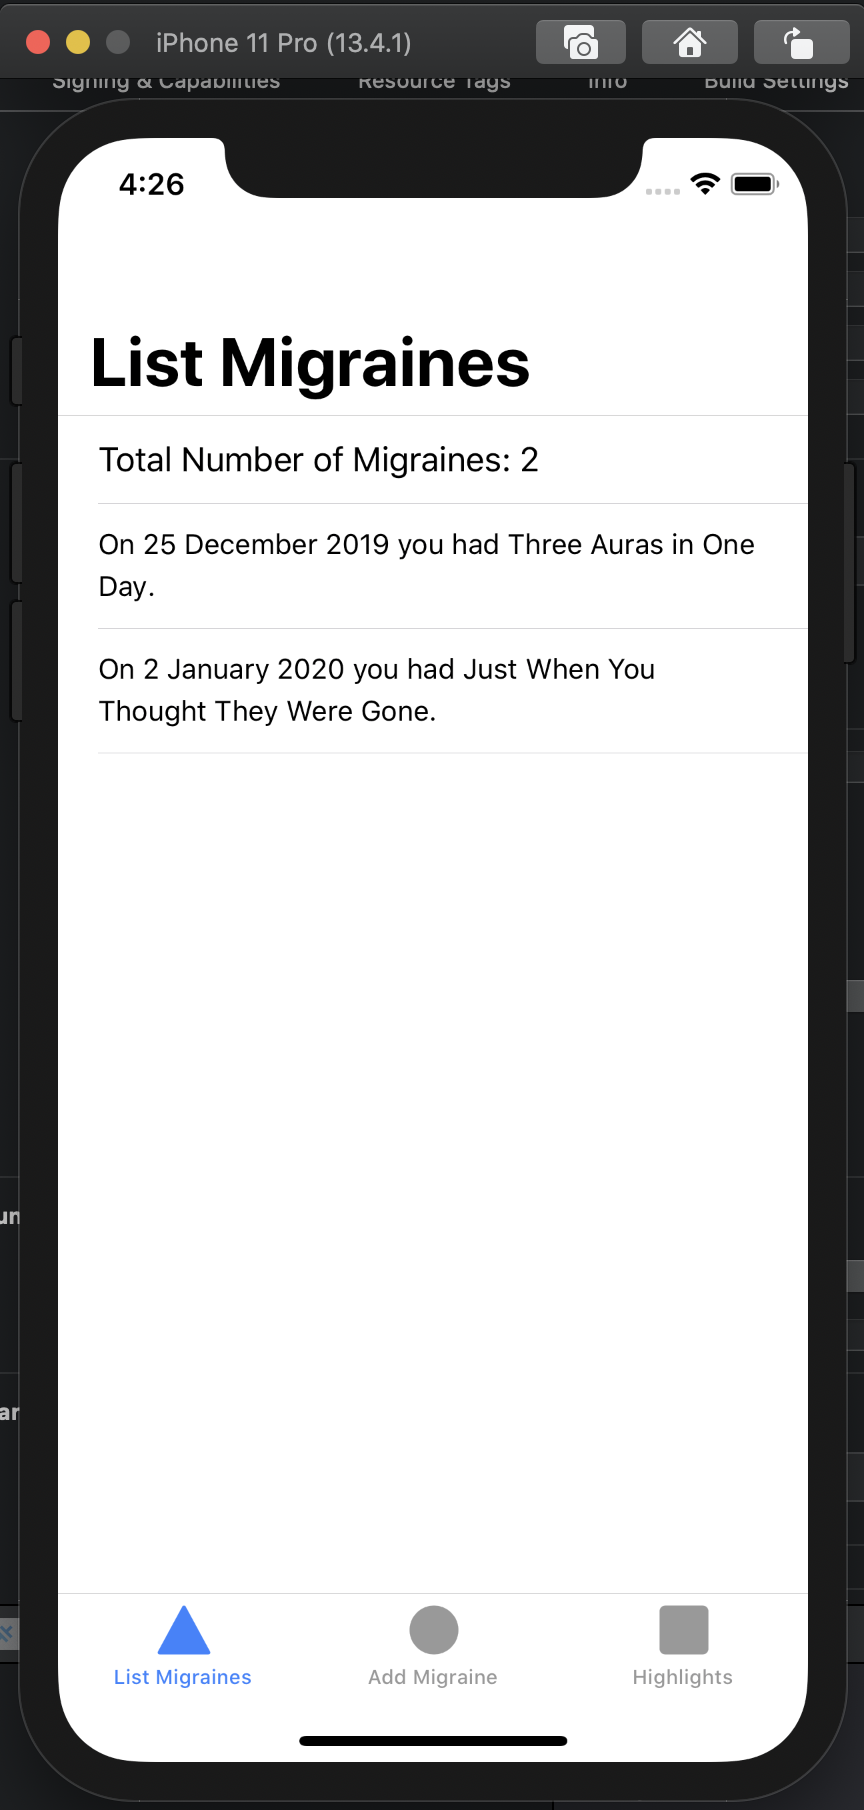
Finally, let us see the migraines by updating the ListMigraines tab as follows to display a list of migraines using the IonList component including utilising the IonItemSliding to provide a way to delete the migraines with a swipe of a finger. Also of note is my use of uuid package to generate unique key property as required by React (install it with npm install @types/uuid --save).
Adding Basic Storage
Within Ionic React, I find the Capacitor Storage to be the easiest to work with:
https://capacitor.ionicframework.com/docs/apis/storage/To make things really simple, we need to update the initialisation in App.tsx to load the migraines from (phone) storage, update the adding in AddMigraine and removal in ListMigraines and we are done. Unfortunately, things are not completely trivial because the calls to Storage are using async functions and thus we need to think asyncroniously!
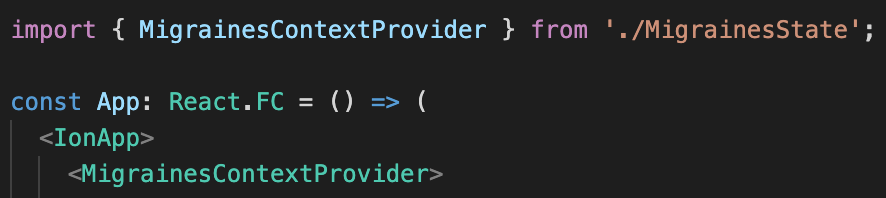
The first thing that may come to mind is to modify the App.tsx and make the value property load from the Storage component directly. Unfortuntately, it is not possible to do it as Storage will go off asyncroniously loading the data for migraines but the Provider component has to move on - likely with an empty, unloaded array still. To fix this, we will need to resort to a new concept, called useState React Hook which will need to be used to set the value property of the MigrainesContextProvider initially to something like an empty array and then update it using an additional set action once the Storage component finished loading! The first step to achieve this is to simplify the App.tsx to simply import MigrainesContextProvider which will be custom made inside MigrainesState.tsx thus requiring nothing to be done other than the actual wrapping in App.tsx:
We will then replace the current default and not customised let MigrainesContextProvider = MigrainesContext.Provider; with a custom written one defined as follows:
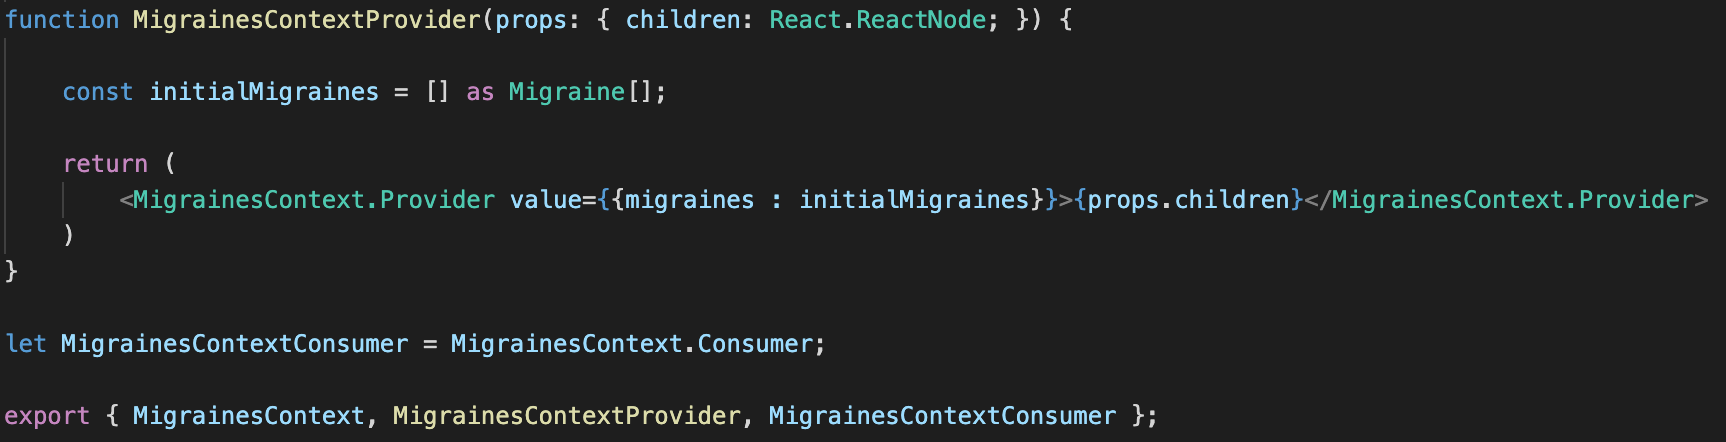
As you can see we now have the ability to replace the initialMigraines with an appropriate loading procedure from Storage with the caveat being that initially it needs to be set to an empty array, but once the async loading resolves we will need to update it to the value we will get from storage. This is exactly the time and place to utilise useState React Hook which uses the following syntax and allows us to call setInitialMigraines function in our async function to update the value:

Finally, we can add loading code as follows, but we also have a problem that we need such code to only run once when component is loaded not every time it is re-rendered! A cool trick I found on this other blog post is to parameterise useEffect hook with a dependency (its second parameter) which will tell React when to call useEffect hook because that part has changed. By default useEffect is called every time a component is re-rendered but by placing a "fake" dependency on an empty array [] we trick it into running only once when component is mounted or loaded:
Please carefully observe a number of important things happening inside useEffect() including being careful to ensure that Type Script will be convinced that JSON.parse is not passed a null value with an appropriate null check beforehand. Finally the opposte of JSON.parse is JSON.stringify that allows us to store the entire array of Migraine objects in a value associated with a key migraine in our local Storage. The final MigrainesState.tsx is as follows:
Finally some ovious modifications are made to the ListMigraines.tsx and AddMigraine.tsx so that the deletions and additions are saved. The final code (only the src folder) is available for download here.
Deploying Your App to a Phone
There are many instructions online on how to deploy your Ionic App including on the official site:
https://ionicframework.com/docs/react/your-first-app/6-deploying-mobileHere, I simply observe a couple of caveats when using the latest Mac and XCode. After you ran ionic build command and adding iOS capacitor using ionic cap add ios command you are ready to open the App in XCode using ionic cap open ios command. At any point if you make updates to your Type Script code you can copy it over using ionic cap copy and vice-versa you can pull some changes back using ionic cap sync.
Here at VUW, our students have access to a large Apple Development Team, so you will need to find an appropriate setting to ensure that under Project Properties and under Signing \& Capabilities, your Team is set to the appropriate Apple Approved value. In my case, my Personal Team has the right permissions using our local School of Engineering and Computer Science Apple Developer accounts. Beware that you also need to set Bundle Identifier to something meaningful (in my case I set it to: nz.ac.vuw.ecs.alex). Finally, select an appropriate simulator - say "iPhone 11 Pro" and click "Play" icon in XCode - that's all!
The only caveat I found with the steps above is that sometimes, brew stuffs up the pod command by making it rely on the old version of Ruby so XCode fails to build with obscure errors that can be fixed by ensuring that your pod command works in the Terminal and by re-running pod install in the appropriate Pods directory. Here is what you should see:
Finally, to deploy on the actual iPhone you just need to plug it in and select it instead of an emulator. Remember to go to Settings - General - Device Management - Developer App on your iPhone and ensure that you trust your own App for the XCode to be able to deploy it. Also, I decided to change the Display Name just above Bundle Identifier to something that fits more easily on the App Screen.

Exclusive post. Thanks for sharing.
ReplyDeleteFreelance Ionic App Developer
I got a problem when updating the ListMigraines using the uuid. I got this error:
ReplyDeleteERROR in ./src/pages/ListMigraines.tsx 99:13-20
export 'default' (imported as 'uuid') was not found in 'uuid' (possible exports: NIL, parse, stringify, v1, v3, v4, v5, validate, version)
ERROR in src/pages/ListMigraines.tsx:25:12
TS2746: This JSX tag's 'children' prop expects a single child of type 'ReactNode', but multiple children were provided.
23 |
24 | { (context : Migraines) =>
> 25 |
| ^^^^^^^
26 | Total Number of Migraines: {context.migraines ? context.migraines.length : 0}
27 | { (context.migraines)
28 | ? context.migraines.map((m : Migraine) =>
Is it no longer working for ionic 6?